We have a small RV that we use as a mobile office while we’re setting up new developments. We modified the small, factory battery/inverter system in order to support our more demanding needs. Many customers have asked us for the details so they could set up something similar. The setup described below could be used in a RV or small cabin and is scalable to handle more capacity as you go.
Here’s what we have:
- Generac GP2500i – 2,500 Watt Inverter Generator – This generator is extremely quiet and very fuel efficient. It’s similar to the Honda 2,200 Watt Inverter generator at less than half the price. This generator has enough power to run the small AC in our RV as well as the lights and other smaller accessories. If you have a larger RV and/or a higher electrical demand, you may want to consider the Generac GP3300i. You can get cheaper non-inverter style generators but you’ll quickly eat up your savings in fuel costs as they are not as efficient.
- Vatrer 12V/100Ah LiFePO4 batteries – These batteries are a little pricey but they last much longer than AGM or other deep cycle batteries. They also allow you to drain them more completely without damaging the battery which makes them more useful. If you have an RV with existing batteries, you should be able to upgrade to these by just swapping them out and changing the settings on the existing charge controller to match lithium batteries. You can start out with one or two of these batteries and scale them up as you go. These batteries are also good because they have protection circuits to prevent overcharging, over discharging and short circuiting. This is a big plus for batteries you may have to leave unattended for a while.
- If your RV doesn’t have a built in charge controller to charge your batteries off of “shore power” or the generator, or you want to have a separate battery power system, you’ll need to be able to charge the batteries. You can get just about any charger that supports Lithium batteries for this purpose. The higher the charging amps, the faster you can charge your batteries. We went with a Victron 12V, 30 Amp charger which has a bluetooth app to allow you to monitor what it’s doing. The Victron chargers are very efficient and don’t generate as much heat as many other chargers do.
- In order to run off of the sun, we started with getting low profile, flexible panels to add to the roof of the RV. These are more expensive but are easy to install and you don’t really even notice them. We went with Renogy 100 Watt flexible panels as I think they’re a little more reliable than the more generic panels out there. We could fit 6 panels on the open space on the RV, so that’s how many we purchased. We also purchased these connectors to take all 6 panels down to one connection for the charge controller.
- To charge the batteries off of the solar panels, you’ll need a solar charge controller. There are inexpensive PWM charge controllers that will work for many simple applications but since we’ll be utilizing our system pretty heavily, we went with the more efficient MPPT style controller. We used the Renogy 60A charge controller that can handle 800 watts of solar panels in a 12v configuration. You can also get a plug in Bluetooth module if you’d like to be able to monitor the system with your phone. It is recommended that you also get a separate battery monitor so you can quickly see the status of your batteries and monitor how they’re charging without having to go through your phone.
- In order to convert the battery power to 110v power for household type devices, you’ll need an inverter. For our setup, we chose a 2000 watt Renogy Pure Sine Wave Inverter. This inverter is rated for 2000 watts continuous and 4000 watts peak power. Many cheaper inverters quote the peak power output rather than the continuous output so watch out for that. This inverter is able to run the small AC in our RV but the run time is limited by the number of batteries you have and/or the amount of solar power that’s available. This inverter is more than enough to run basic power tools and kitchen appliances that you may want to have with you on the land.
- We initially purchased two of the Vatrer 12V/100Ah LiFePO4 batteries but decided to scale up to four in order to have more reserve power. In order to have enough solar power to charge the additional batteries, we purchased 6 additional 100 watt Renogy solar panels. These are the more standard rigid frame panels that are cheaper. We mounted these on 2×4 collapsible frames that could be placed inside of the RV when we leave for an extended amount of time or when we need to relocate the RV. Since our total solar power is above the 800 watts that our charge controller can handle in 12 a volt configuration, we purchased another Renogy 60A charge controller to handle these new panels. We could have set up the system in a 24 volt configuration in order to only use one charge controller but we wanted to keep everything at 12 volts to run accessories without needing DC to DC voltage converters. You can have multiple charge controllers charging the same battery bank as long as they’re configured for the proper battery type and as long as only one controller is set up to do any sort of periodic battery maintenance cycles. We utilized the same six way connectors we used for the rooftop panels as well as these cables to allow us to locate the panels away from the RV in a sunny spot.
- For internet access, we set up a Verizon Internet Gateway which has worked very well for us. We’re able to upload videos and watch Netflix at night. We got this through our business account so I’m not sure if it’s available for a normal Verizon account but I believe their normal hot spots should work about as well. I think the gateway or hot spot only added around $8-10/month to our regular bill.
- When the leaves came in this spring, our cellular data signal quality dropped significantly. To boost it back up, we purchased a weBoost Destination RV signal booster. This one is pretty pricey but we needed to be able to upload marketing videos for the land and opted for the top of the line option. There are other models that are almost half the price that have pretty good reviews.
- For security, we purchased these Eufy 2k resolution wireless cameras with solar panels to keep them charged. These cameras record to a base station and it doesn’t require a monthly subscription. They also are able to trigger based on “human movement” so you don’t get very many false alarms. The cameras connect through our Verizon internet and stay on 24/7 allowing us to check out the RV at any time with our phones. This setup has worked great for many months now and the solar panels keep the cameras charged all the time.
- To make everything a little more automatic, we added an automatic transfer switch to our setup. This device allows everything to run off of the solar/batteries/inverter until you crank up the generator. When the generator starts, all of the AC circuits switch to run on the generator and the batteries will also be charged by the battery charger powered by the generator (see illustration below). If you have electronics that don’t do well with the power cutting out as the switch over is made (like a desktop computer), you can utilize an uninterruptible power supply (UPS) like this one to maintain constant 110v power while everything switches over.
- You’ll also want to add breakers/fuses on any of the wires that leave the positive battery terminals to protect against short circuits. The sizes will need to be determined based on your particular setup. These are the types of re-settable breakers that we used.
- Additionally, you’ll need high amperage battery wires and connectors/tools as well as solar specific (UV resistant) wires/connectors and tools.
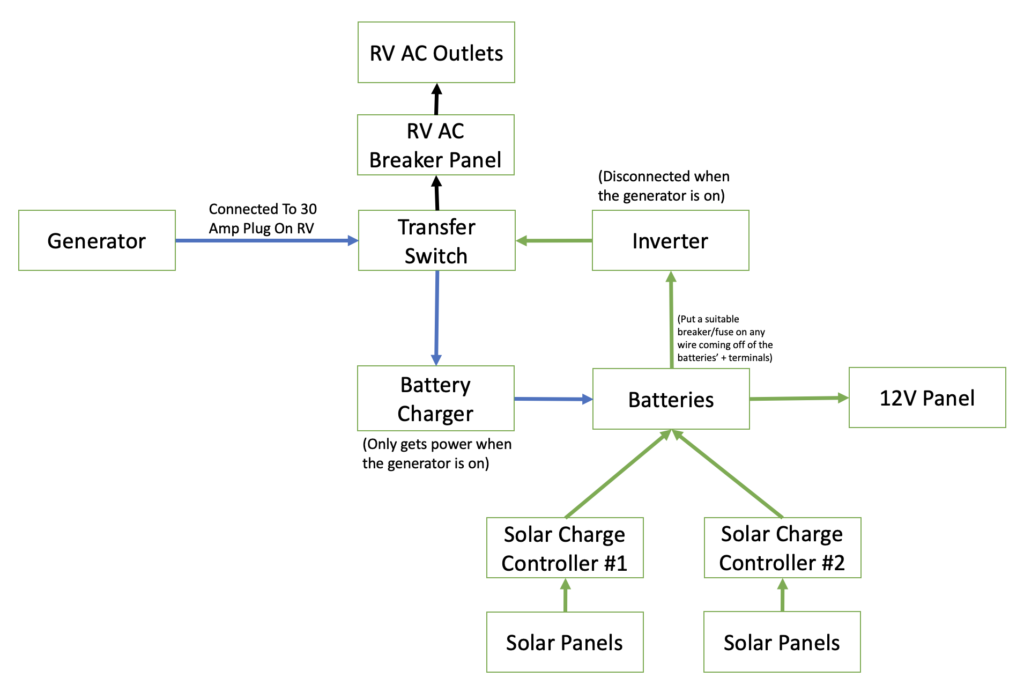
- Here is a rough schematic to help visualize how everything is connected.
Hopefully this info helps to give you some ideas about what you can do to have remote power on your land. We plan to add to this post as we try new things and further refine/expand our setup.